Korean Milk Bread Loaf | 우유식빵
OOO-You Sheeq-Bbahng
A recipe worth sharing | recipe by 꾸움 Kkuume
What: Korean Milk Loaf by 꾸움 Kkuume. If you've never tried Korean Milk Bread, you are missing out! It's the only type of white bread I eat.
Taste: Heavenly, cloudy, white bread with a milky touch to it!
How It’s Made: Create dough with minimal kneading. A lot of setting aside to wait for dough to rise. Once dough has risen multiple times, place in loaf pan and bake. And viola! You have bread.
Notes & Tips: This recipe is very easy to follow, the final product came out PERFECT. Use a digital scale, not measurement by the cup or spoonfuls. Just keep in mind that there are many steps to this recipe (briefed below)! Also, I only had active dry yeast on hand. The recipe calls for instant yeast. So I activated the yeast in the recipe’s liquids along with 1 tsp of the sugar used in the recipe.
Review: This recipe is superb. I tried a lot of other recipes and failed, but this one was very easy to follow. If I can do it, you can do it. The final product, the wonderful milk bread loaf, came out perfect. Exactly the same, cloudy white bread milk taste you get from the Korean Bakeries. Such a great recipe on YouTube. It was very straightforward. The process was a bit tedious, in that it had many steps, but so worth it in the end.
Ingredients:
Bread flour 300g (2cup)
Sugar 30g (2Tbsp+1tsp)
Salt 4g (1tsp)
Instant dry yeast 3g (3/4tsp) (I only had dry active yeast, so I activated in the warm milk and a tsp of the sugar from above)
Whole milk 105g (105ml)
Water 110g (110ml)
Unsalted butter, room temp, 20g (4tsp)Instructions:
Instructions:
In a large mixing bowl, mix 300g bread flour, 30g sugar, and 4g salt. Add in 3g instant dry yeast.
If using active dry yeast (not instant), activate the yeast in 105g warm milk with 1 tsp of sugar from the 30g of sugar above.
Mix the dry mixture.
Warm up 110g of water and 105g of milk in the microwave for 45 seconds. It’s okay to warm it up together. Stick a clean finger in it, and make sure it’s warm.
Add liquid to dry mixture. Mix in a circle motions. Once you see no flour, cover it and let it sit for 15 min.

Recipe & Video by 꾸움 Kkuume
After 15 minutes, add in 20g of butter. Spread it around and mix until all butter is absorbed. The dough should form into a ball.

Recipe & Video by 꾸움 Kkuume
Add some oil to your mixing bowl so the dough ball won’t stick. Rub the dough ball around in the oil coated bowl. Place dough ball in the bowl and cover. Set aside for 40 min.
After 40 min, knead by folding the dough for 2 min. Cover and set aside for 30 min.
After 30 min, knead by folding the dough for 2 min. Cover and set aside for 40 min.
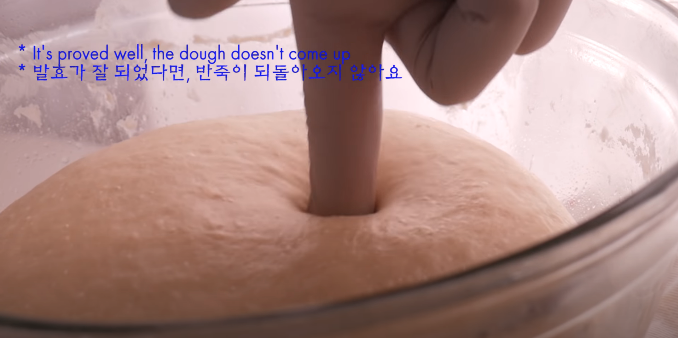
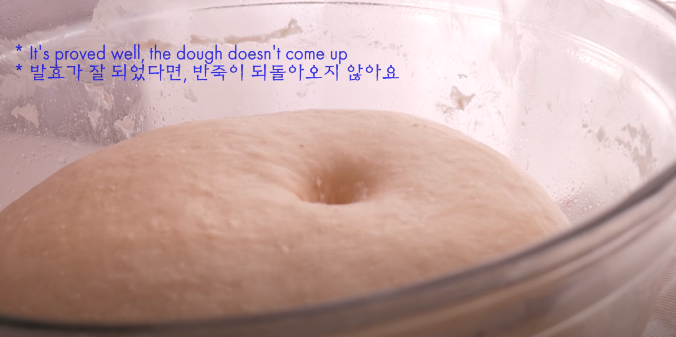
After 40 min, dip your finger in flour. Stick your finger in the center of the very risen dough ball. If proved well, the indentation of your finger shouldn’t come up and shouldn’t close into a whole dough ball again.
On an even, floured surface, quickly roll out the dough with your hands. Split it into two even pieces (use a digital scale to measure out two even pieces, about 280g each). Round each piece into two cylinders. Cover and set aside for 15 min.

Recipe & Video by 꾸움 Kkuume
In the meantime, oil your loaf pan.
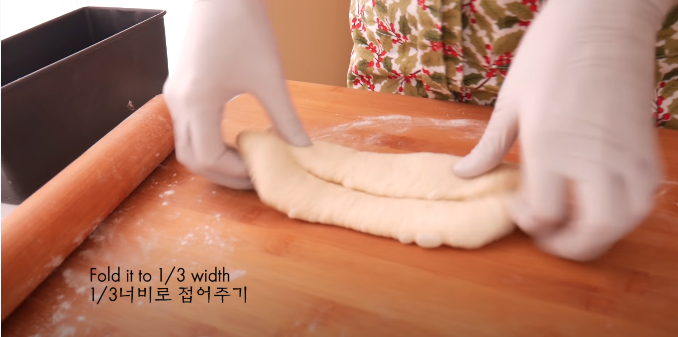
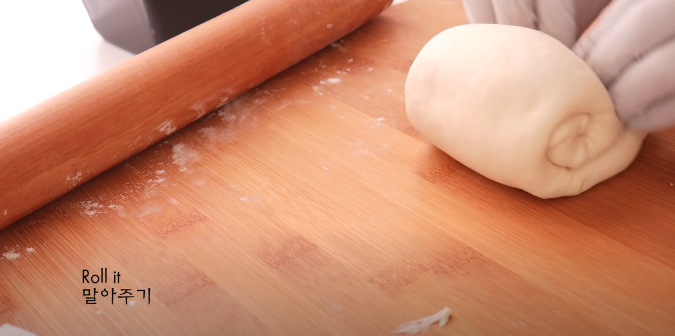
After 15 min, flour your surface and roll out each dough into rectangles both ways. Fold the long sides INTO the middle and then roll it in towards you. Place the two rolled doughs at the edge of a VERY well oiled loaf pan (make sure the sides are all oiled up, all the way to the top!). Must water on the tops of the rolled doughs with a spray bottle. Cover and set aside for 1 hour and 10 min.
In the meantime, whisk 1 egg yolk with 1 tbsp of milk. Preheat oven to 375F.
After 1 hour and 10 min, paint the tops of the doughs with egg wash (beaten egg with a splash of milk). Bake for 25 minutes. After 25 minutes, drop the loaf pan to release any hot air. Take out the loaf immediately and let it cool.

Recipe & Video by 꾸움 Kkuume
Enjoy!
for more recipes & tips, follow ahnestkitchen on instagram!